Backpacking Fried Rice
Backpacking fried rice is your next favorite comfort camping meal. This recipe uses dehydrated rice with built-in Chinese restaurant flavor, plus colorful, dehydrated vegetables. I’ll show you how to make it with or without scrambled eggs, using a backpacking pot or frying pan.
Photo: Fried rice with scrambled eggs.
Table of Contents
Dehydrating Fried Rice
To give this backpacking fried rice recipe its umami kick, all the seasonings are added to the rice before drying it. When the meal is rehydrated, the flavors release into the whole meal.

Photos: 2 cups of cooked and seasoned jasmine rice on silicone tray before and after dehydrating.
Cook the Rice
Follow the cooking directions on the bag for the rice you are using, but instead of using plain water, use fat-free vegetable, chicken, or beef broth. Different types of rice require different amounts of water. If you don’t have broth on hand, at a bouillon cube to the water.
For this recipe, I cooked jasmine rice in water seasoned with vegetable bouillon.
Ingredients:
- 1½ cups of jasmine rice (260 g)
- 1⅔ cups of seasoned water or broth (393 ml)
Bring to boil, reduce to low simmer for 10 minutes. Let sit another 10 minutes off heat.
Yield: 4 cups of cooked rice.
Season the Rice
Fluff cooked rice with a fork and stir in the seasonings.
Seasonings for 4 Cups of Cooked Rice:
- 5 Tbsp. soy sauce
- 1 Tbsp. oyster sauce*
Optional: 2 tsp. sriracha sauce for extra heat.
* If you don’t have oyster sauce, use an extra tablespoon of soy sauce.
Dehydrate the Rice
If using an Excalibur or Cosori dehydrator, spread 2 cups of cooked & seasoned rice on each of 2 nonstick sheets or trays.
Dehydrate rice at 145°F (63°C) for approximately 4½ hours until crispy dry. About halfway through the drying process, stir rice around the trays and pull apart any clumps of rice.
Yield: 4 cups of cooked rice yields approx. 2 cups of dried rice.
Explore more: Everything you need to know about dehydrating rice.
Vegetables for Backpacking Fried Rice
This backpacking fried rice meal benefits from using a mix of colorful vegetables. Chickpeas and peas are good sources of vegetable protein.

Photo: Bell peppers, carrots, chickpeas, and peas on silicone mesh dehydrator sheets for a Cosori dehydrator.
Dehydrating Vegetables
I dried a mixed load. The bell peppers took a little longer than the other vegetables.
1. Bell Peppers. Wash and dice peppers. Dehydrate at 125°F (52°C) for approx. 9 hours.
2. Carrots. Peel and cut carrots into desired shapes. Steam for 6 minutes. Dehydrate at 125°F (52°C) for approx. 7 hours. Steaming helps the carrots retain a nice dark orange color.
3. Frozen Peas. Thaw peas, then steam for 6 minutes. Lightly crush peas with a fork. Dehydrate at 125°F (52°C) for approx. 5½ hours. Crushing the peas lightly prevents case hardening (outside dries, but inside retains moisture). Crushed peas rehydrate much better in meals.
4. Canned Chickpeas. Drain and rinse chickpeas. Cut each chickpea in half. It takes 10 minutes to process 1 can. Dehydrate at 125°F (52°C) for approx. 5½ hours. I cut the chickpeas in half to prevent case hardening and to ensure they rehydrate better in meals. Another option is to mush them slightly between 2 cutting boards.
5. Green Onions. See Dehydrating Onions.
6. Pineapple. Optional, but delicious when you include some.
See: Dehydrating Pineapple.
Explore more: Everything you need to know about dehydrating vegetables.
Backpacking Fried Rice Recipe

Photo: Dried ingredients for backpacking fried rice. Not shown but recommended: dried pineapple and dried green onion.
Fried Rice Ingredients
1 Serving
- ½ cup dried fried rice (60 g)
- ½ cup dried vegetables (40 g)
- 1 egg or equivalent egg crystals*
- 2 tsp. oil for cooking eggs
- 1⅓ cups water to rehydrate (315 ml)
1 XL or 2 Servings
- ¾ cup dried fried rice (90 g)
- ¾ cup dried vegetables (60 g)
- 2 eggs or equivalent egg crystals*
- 2 tsp. oil for cooking eggs
- 2 cups water to rehydrate (473 ml)
* This meal can be made without eggs. It still tastes great. Whole eggs can be used, but that is more practical in a camping scenario than a backpacking trip. In both cases, a lighter weight option is to make scrambled eggs using OvaEasy Egg Crystals.
Cooking Fried Rice on the Trail
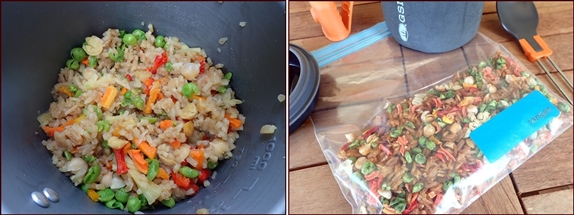
Photos: Fried rice and vegetables can be cooked in a pot or freezer bag.
Cooking backpacking fried rice without eggs is a one-step process that you can manage with a single backpacking pot or combination of a pot and freezer bag for rehydration.
Pot Cooking: Combine dried ingredients with water in pot and let soak 5 minutes. Light stove, bring to boil, and then remove pot from stove. Insulate pot and wait 20–25 minutes for meal to finish rehydrating.

Photo: Backpacking fried rice cooked in pot before scrambled eggs were added.
Freezer Bag Cooking: Boil water and add to dried ingredients in a 1-liter freezer bag or Mylar bag. Insulate bag and wait 25–30 minutes.
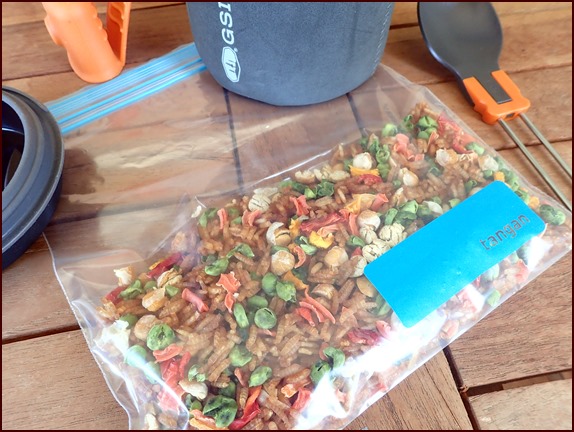
Photo: Pack meal in a 1-liter freezer bag or Mylar bag if you intend to rehydrate it as a freezer-bag-meal.
Cold Soak: This meal tastes great as a cold meal, too. An hour or 2 before lunchtime, combine dried ingredients with cold water in leak-proof container.
Cooking Scrambled Eggs on the Trail
When eggs are included in this backpacking fried rice, a single pot can be used in 2 steps, or an additional frying pan can be used in a car camping scenario where you have the luxury of carrying more cooking gear.
Carrying whole eggs in a backpack is a heavy, potentially messy option that takes up valuable space. Fortunately, eggs can be carried into the backcountry in the form of OvaEasy Egg Crystals.

Photo: Each package of OvaEasy Egg Crystals contains the equivalent of a dozen eggs.
Buy OvaEasy Egg Crystals on Amazon.
Disclosure: As an Amazon Associate, Backpacking Chef earns from qualifying purchases. Thank you.
Egg Equivalents:
- 2 Tbsp. egg crystals + 3 Tbsp. water = 1 egg.
- 4 Tbsp. egg crystals + 6 Tbsp. water = 2 eggs.
Whisk until mixed well, and then cook like regular scrambled eggs.
Cooking Scrambled Eggs in a Backpacking Pot
The trick to scrambling eggs in a pot is to use at least 2 teaspoons of cooking oil. I like sunflower oil, since it doesn’t have the stronger taste of olive oil.
1. Coat the bottom and lower sides of the pot with cooking oil.
2. Place pot on stove and light stove. Keep the flame dialed down low.
3. Immediately pour in the egg mixture.
Never let an empty pot sit on a stove for more than a few seconds.
4. Stir continuously with a spoon or spatula while grasping the pot handle with your other hand. Be prepared to lift the pot off the stove if the eggs appear to be cooking too fast.
Scrambled eggs will be fully cooked in under a minute.
Even with the oil, some egg may stick to the pot, requiring a light scrubbing to clean up.

Photo above: Scrambled egg cooked in a GSI Outdoors Halulite MicroDualist backpacking pot using a GSI Outdoors canister stove. The pot does not have a nonstick coating.

Photo: GSI Outdoors' sturdy pot handles are great for active cooking. Handles lock down over lids when stowed.
Explore: Backpacking & Camping Cookware at GSI Outdoors.
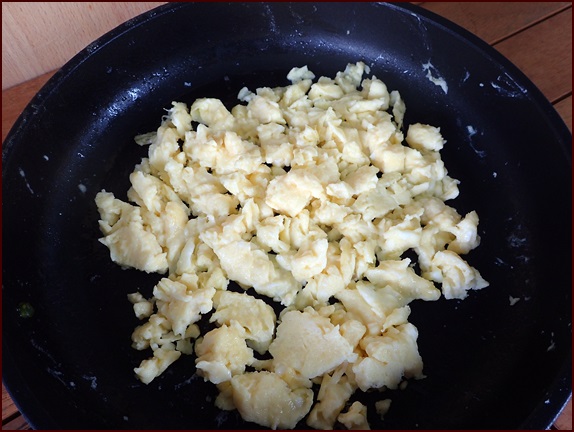
Photo: Scrambled eggs cooked in a frying pan more likely in a car camping scenario.
Assembling the Meal
1. Cook the eggs first and set aside in a bowl.
2. Rehydrate the dried rice and vegetables with boiled water as previously described.
3. Stir scrambled eggs into the meal a minute or 2 before the meal finishes rehydrating.
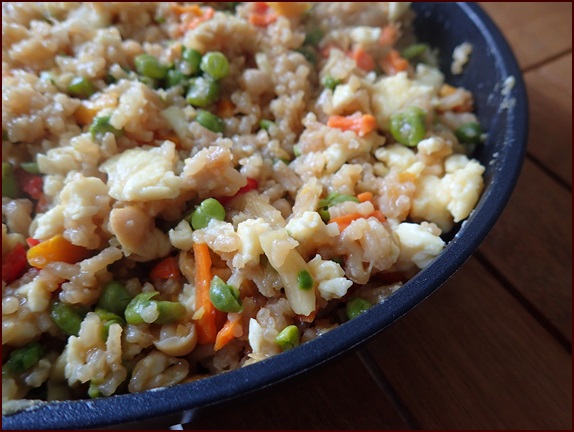
Photo: The complete backpacking fried rice meal in a pan, but just as easily combined in a pot.
Cosori Dehydrator & Accessories
Shop Amazon for the Cosori dehydrator and accessories used for dehydrating fried rice and vegetables on this page. The silicone trays and silicone mesh sheets are flexible, truly nonstick, and are very easy to clean. Mesh sheets can be cut to size with scissors.

Left: Hlimior Silicone Dehydrator Trays with Raised Edges, 12” x 10.6”, 6-Pack
Middle: Cosori Dehydrator, Stainless Steel, 6-Trays
Right: Dostk Silicone Mesh Dehydrator Sheets, 14” x 14”, 12-Pack
Below: OvaEasy Egg Crystals

Disclosure: As an Amazon Associate, Backpacking Chef earns from qualifying purchases. Thank you.
Share this page with friends on social media.
Free E-book & Newsletter
Free with Trail Bytes subscription.
Dehydrating Food from A–Z


