Backpacking Food Ideas for Lunch

When it comes to backpacking food ideas for lunch, some like it hot and some like it cold. I cook hot lunches using dehydrated meals for longer backpacking trips, but on shorter trips where food weight and spoilage are not a big factor, fresh foods work just fine.
Lunch Recipes on this Page:
- Curried Salmon Salad Sandwich
- Turkey BBQ Sandwich
- Beef & Bean Burritos
- Sloppy Joes
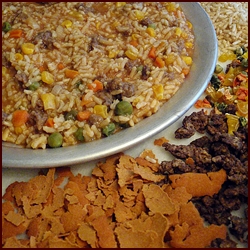
I fix hot lunches such as Bean Bark Stew (shown at right) on longer trips because I already have the stove and pot in the pack. Might as well make full use of them.
My hot lunches are the same dehydrated meals that I cook for dinners and they meet my requirement of being light-weight, compact, and well-preserved. And, of course, delicious!
Meals with rice as a base ingredient are my first choice for lunch. When I eat a hot lunch with rice, beef, and vegetables, I get a noticeable power surge and feeling of well-being about 30 minutes after getting back on the trail.
Thermos Cooking Saves Time
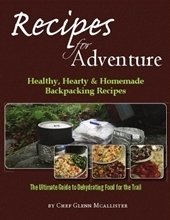
Cooking a hot lunch is more difficult when it’s raining. One way to avoid cooking during your lunch break is to prepare the meal in advance using a Thermos brand 24-Ounce Food Jar. Simply add 25% more boiled water than called for in any of the recipes in Recipes for Adventure. The Thermos will keep the meal hot for up to nine hours, so you can add the boiled water in the morning while you have your stove out during breakfast. Another scenario would be to add boiled water to your oatmeal before you go to bed so you can get a fast start without cooking in the morning.
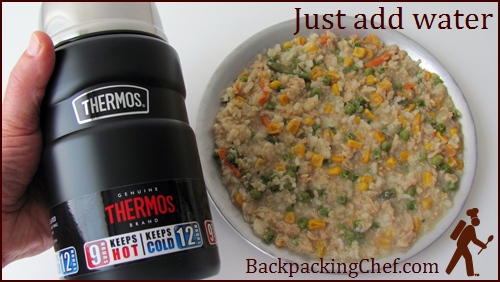
Hot Chicken Lunch Recipe: ¼ cup dried chicken, ¼ cup dried rice, ¼ cup dried quinoa, ¼ cup dried mixed vegetables. Add 1¼ cups boiled water to the food in the thermos, seal and shake. It will be ready to eat in twenty minutes or will stay hot for hours.
Tips:
1. Since the meal will have more time than usual to absorb water, add 25% more water than called for in the recipe.
2. This meal will have plenty of chicken flavor if you precook the rice and quinoa in chicken broth before drying. Also, you can go with all rice or all quinoa instead of the 50/50 mix.
Great for day hikes and work lunches, too!
The Thermos method of cooking and rehydrating a meal is a great way to prepare hot lunches for work or road trips. Add the hot water in the morning, shake it a few times and come lunch time you will have a ready-to-eat meal. One tip from Thermos is to preheat the food jar with hot water. To save water on the trail, you can add boiled water to the thermos, seal for a couple of minutes, pour the water back into your pot, and bring back to a boil.
View the Thermos Food Jar at Amazon
The Thermos Food Jar also keeps cold food cold, so you could add fresh cold water from a spring to a rice meal and eat it like rice salad for lunch.
What are your best backpacking food ideas for lunch?
Use the form at the bottom of the page to share your best backpacking food ideas for lunch and I will post them here. You can share a list of your favorite types of backpacking lunches, a complete recipe or some tips that work for you.
Here are some backpacking lunch recipes shared:
Curried Salmon Salad Sandwich
Shared by Erika Klimecky from Seattle, WA:
Salmon is one of the highest quality proteins around and being a Seattle local, it's almost a requirement! Curry has anti-inflammatory properties and cherries relieve pain. And I love crunchy fresh fruit on the trail.
All of this comes together for my favorite trail lunch. It's perfect on Day 2 of a long slog when your body needs the lift. As a bonus, the only tool that gets dirty is a stirring utensil (I use my camp knife) so there is no cleanup.
Ingredients:
- 1 pkg vacuum sealed pink salmon
- 2 packets shelf-stable mayonnaise
- ¼ Cup dried cherries (dark or tart)
- ¼ Cup diced tart apple
- ¼ Cup diced celery (optional)
- 1 tsp yellow curry powder
- 2 whole-grain sandwich buns or other bread to make 2 sandwiches.
Open the top of the salmon packet and add the two mayonnaise packets and curry powder. Stir well. Squeeze it out onto the bread then press the celery, cherries and apple into the sauce. Close the sandwiches and hand one to a friend.
I minimize trash on the trail by packing the curry in a small bit of cellophane and place it inside another small bit of cellophane with the bread. I pre-cut the celery and apples, combining them in a snack-sized Ziploc bag. For cleanup, all that remains is the salmon and mayo wrappers and the cellophane. They tuck nicely inside the Ziplock that the apples and celery were in.
Turkey BBQ Sandwich
Shared by Longskirt of Evansville, IN
Tangy and juicy Turkey BBQ sandwich is a great treat and nice change from soups and stews.
Serves 1:
Ingredients:
- Dehydrated or freeze dried meat -I used freeze dried turkey
- Tomato powder
- Dehydrated onion flakes
- Dehydrated black beans
- Optional: Dehydrated veggies like corn, celery, peppers
- Molasses powder or brown sugar
- Salt, pepper, dry mustard, red pepper flakes or cayenne to taste
- One packet or 1/2 oz extra virgin olive oil
- One packet balsamic or other vinegar
- One clove raw garlic
- Optional: Dehydrated low fat cheese or you could sub in fresh cheese
- Optional: Dehydrated sauerkraut
- Bread, roll, or tortillas
At Home:
Mix enough of first 7 ingredients to make 2-4 ounces by weight, depending on the size of your backpacker appetite. Package these in a ziplock or vacuum seal bag.
Bag the dehydrated cheese separately and dehydrated sauerkraut separately.
Use a larger bag to contain the chili, cheese and sauerkraut and the garlic clove, vinegar and oil packets.
On the Trail:
First add enough cold water to just cover sauerkraut to rehydrate it.
With
the cheese you can either add it to the BBQ before rehydrating or
after. It will be crunchy if you add it after, though. I haven't tried
rehydrating it separately. Sounds messy.
Mince the garlic clove and add it to the BBQ mix.
Boil
water and add enough to just cover BBQ mix in bag, bowl or mug and let
it sit for 15-30 minutes wrapped in something to hold the heat in.
Then mix in the olive oil and vinegar and serve on bread or tortillas topped with sauerkraut.
Additional Comments:
Sorry
I don't have quantities on the ingredients. I just eyeball the
proportions. This stuff was really good. Quite a treat to have a tangy,
juicy hot sandwich for dinner instead of soup or stew. While beans and
veggies aren't usually found in BBQ, I try to incorporate dehydrated
vegetables in all my backpacking dinners and lunches when possible. -Longskirt
Beef & Bean Burritos
A Tasty Backpacking Food Idea Shared by PasnThru
Serves 3:
Ingredients:
- ½ Tbsp Olive Oil
- ½ Cup Chopped Onion
- 1 tsp Minced Garlic
- 1 Cup Water
- 1 Can of Canned Beef(14 oz)
- 2 tsp Chili Powder
- 1 tsp Dried Leaf Oregano, Crumbled
- ½ tsp Ground Cumin
- ½ tsp Salt
- ¼ tsp Ground Pepper
- 1 Can Re-fried Beans (16 oz)
- 1 Can Enchilada Sauce (10 oz)
- 6 Flour Tortillas (8-inch, non-refrigerated) wrapped two at a time in foil
At Home:
The canned beef needs a little preparation. Pour meat onto a plate and rinse the congealed fat and liquids from the meat under running water. Using a fork or fingers, lightly shred the beef into bite size pieces. Watch for and remove any fat in the meat.
Heat oil in a large skillet over medium heat. Add onion and garlic, sauté until onion softens.
Add water, chili powder, oregano, cumin, salt, and pepper. Simmer for 2-3 minutes.
Add meat, re-fried beans and enchilada sauce. Heat thoroughly, stirring often. Add just enough water to make the mixture thin enough to pour and spread evenly on dehydrator trays.
Dehydrate at 125° for 8 – 10 hours. After about four hours in the dehydrator, break up any mixture that is stuck together with your fingers to expose pieces to more air circulation.
Divide dried mixture into three zip lock bags, each with two foil wrapped tortillas. Makes three 1-cup servings.
On the Trail:
Combine about 3/4 cup water with one cup dehydrated burrito mixture. Bring to a boil and continue cooking another minute or two. Remove from stove and place pot inside insulating cozy for ten minutes. Add a few tablespoons of additional hot water if necessary for a good texture.
Choose your favorite way to heat the two soft flour tortillas. A few clean twigs across the top of a pot of boiling water (already heating for the side dish) makes a nice steamed tortilla. Tortillas spread out on a clean forked stick directly over the fire works well but keeps you busy. Placing the tortilla foil on top of the rehydrating burrito meat with the tortillas on top of the foil is an easy way to soften the tortillas.
Spoon 1/2 of the re-hydrated mixture onto each tortilla; roll up and eat.
Additional Comments or Suggestions:
If you added too much water, you can dip the tortilla in the "stew" or tear up the tortilla to use like crackers in the "soup."
Sloppy Joes for the Trail
Shared by Chef Russ from Rochester, NY
Serves: 4
Ingredients:
- ½ Pound Lean Ground Beef
- Small Onion
- Half a Green Pepper
- ½ tsp Garlic Powder
- ½ Cup Ketchup
- 1 Tbsp Brown Sugar
- Salt & Pepper to taste
- 4 Sandwich Rounds
At Home:
In skillet, cook beef, onion, and pepper. Drain off liquid. Stir in remaining ingredients (except bread) and simmer for 15 minutes. Cover dehydrator trays with non-stick sheets or parchment paper and dehydrate mixture at 135° for 8 to 10 hours. Split dried sloppy joe mixture into fourths and pack in ziploc bags. Pack four sandwich rounds in a separate bag.
On the Trail:
Each person adds their dried Sloppy Joe mix to the pot. Add enough water to cover plus a quarter inch. More water can be added if needed. Bring to a boil, turn off stove, and then let sit covered until rehydrated. Scoop mixture onto sandwich rounds.
Chef Glenn's Suggestion:
For more tender meat on the trail, work in ¼ cup of ground bread crumbs to the ½ pound of raw meat in this recipe before you cook and dehydrate it. As Chef Russ mentioned, use only lean ground beef for dehydrating. -Chef Glenn
Chef Glenn's Comments:
Thanks for sharing these hardy backpacking food ideas for lunch. Tortilla wraps are a tasty way to eat any stew such as
I sometimes carry a block of cheddar cheese and cut off a few slices to
roll up with the meal. An 8-ounce block will usually keep for a day or
two if it's not too hot outside. For longer trips, you can now purchase freeze dried cheddar cheese.
Continue Reading…
Return to Best Backpacking Food Ideas & Recipes shared by readers.
Chef Glenn's Backpacking Recipes for Supper
Chef Glenn's Backpacking Recipes for Breakfast
Share your Best Backpacking Food Ideas for Lunch
Note: I only use your e-mail if I need to contact you about your submission. I don’t save or publish it. The form expands to accommodate any big ideas! Don't worry about any formatting. I'll dust it up before publishing. Hit the Click to Share button when you’re finished.
Thank you for sharing your backpacking food ideas!
Share this page with friends on social media.
Free E-book & Newsletter
Free with Trail Bytes subscription.
Dehydrating Food from A–Z


